Greetings fellow shoemakers and enthusiasts. Welcome back to the blog and let us at carréducker wish you a very happy and prosperous 2011. We hope it is going to be a good one!
After a quiet and restful week off, we are back at work and raring to go. We have our shoemaking course starting here at the Bloomsbury studio on Monday which is very exciting. Looking forward to meeting our eager students.
Life at Gieves and Hawkes continues apace and their customers really seem to appreciate what we are doing. Orders are buoyant and we are very happy there. Not so sure about working on Saturdays, but that, as they say, is retail.
First week back and the first pair I have to make is quite an unusual one - a spade welt. This construction looks best when used on a long, elongated pointed toe, like the black wholecut on our website.
The spade welt is so called because it resembles an ace of spades. This is achieved by throwing out the welt at the joint; pulling in the waists on both sides; and elongating the welt at the toe. I generally use a close welt because I think the lines are smoother and the result is less bulky than if you use a normal or wide welt. The combination of components elongates the shoe and is really quite elegant.
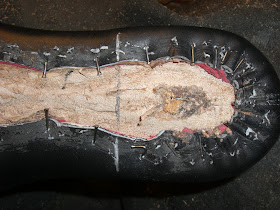
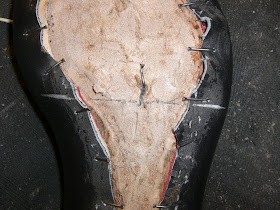
When you prepare your insole, do it as normal, except that at the joint, you move the outside line out by 1/16th of an inch. Exaggerate the curve of the waists and move the line out at the toe (again by 1/16th of an inch). Then last your shoes as normal.
At this point, you need to mark the edge with a silver pen. First mark your heel points. Across the bottom and at the sides.
Now mark the line across the joint.
Finally you need to mark the point on the feather edge where the awl will come out. This is a fraction in from the feather edge. Remember to throw it out at the joints and the toe.
Follow the curve of the holdfast/feather in the waists. These should be elegant and pleasing to the eye.
When you are making the pattern for this shoe, you need to leave more lasting allowance in the waists for these curves.
Your shoe should look something like this.
You can now welt the shoe as normal. The aim is to overwelt at the joints and toe so that you can extend them (or leave them full) when you trim.
Next week I will show you how to trim the welt before stitching on the sole.
So, until then, happy shoemaking.
PS May I apologise for the late post this week, I had an IT incident with our new computer. Basically I couldn't work out how to upload the pics. Such a dunce!


Wow, being an aspiring shoe designer...i would love to gain some much needed work experience in shoe making like that....
ReplyDeleteCheck out my shoe design blog too? All my designs are hand-drawn also...Keep up the great work and take care....x
Louboutininthemaking.blogspot.com
Thanks for the comment, I appreciate it.
ReplyDeleteHave looked at your blog. Very impressive. Keep it up.
Always good to hear from a fellow shoe fanatic.
Jimmyshoe
Always good to hear from a fellow shoe fanatic.
ReplyDeleteBuy Cheap Runescape Gold